This is the latest version of qp, a command line media
player for macOS. The current version has been rewritten in Swift, and
uses the latest Apple media processing technologies.
System Requirements
This program requires macOS 10.13 High Sierra or later.
Download
The qp program is distributed in source code form.
The latest version is available at the following GitHub repository:
https://github.com/edsrc2020/qp
To clone this repository to your local computer:
git clone https://github.com/edsrc2020/qp
Build
You must have either Xcode or the command line developer tools installed.
After obtaining the source distribution, go into the resulting directory and type
make
This will produce a binary named qp, which you can put in
your PATH using any convenient method.
Playing Media Files Interactively
The rest of this article provides a quick introduction to using the
program. These instructions will use the file
names song.mp3 and movie.mp4 as example input
files.
The simplest way to use qp is to run the program with
the -i option followed by the name of a media file:
qp -i song.mp3
or
qp -i movie.mp4
The -i option runs the program in interactive mode. The
difference between using and not using -i will be explained
later.
When you run qp this way, it will:
-
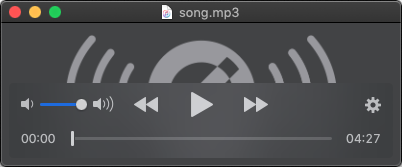
Display a window with a control panel for controlling playback.

-
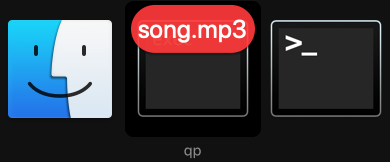
Appear in the Dock and application switcher with an icon that is badged with the (possibly truncated) name of the file being played.

-
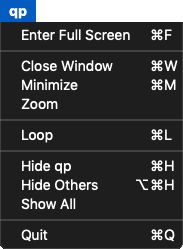
Display an application menu.

The behavior of the program in this mode is similar to the “QuickTime Player” app that comes with macOS.
To quit the program, you can do one of the following:
- Close the playback window.
- Select “Quit” from the app’s menu.
-
Type
Control-Cin the terminal window where you started the program (assuming it is the foreground process).
Working with Tracks
A media file contains one or more tracks. In the most typical cases:
- An audio-only file, such as an MP3 file, contains one audio track.
- A movie file, such as an MP4 file, contains one audio track and one video track.
Listing Tracks
You can ask qp to print the tracks of a media file using
the -T option. When using this option, you can supply more
than one file:
qp -T song.mp3 movie.mp4
song.mp3
  track 1, duration: 00:03:54.553, type: audio/.mp3, 44.1 kHz, 2 channels, 160 kbps
movie.mp4
  track 1, duration: 00:05:16.214, type: video/avc1, 1920 x 1080, 25 fps, 3897 kbps
  track 2, duration: 00:05:16.214, type: audio/aac , 44.1 kHz, 2 channels, 128 kbps
The first item printed for each track is its track ID, a number that uniquely identifies the track. The third item is the type of the track, indicating whether it is an audio or video track.
Selecting Tracks
You can ask qp to play only a specific track and ignore all
other tracks of a file using the -t option followed by a
track ID.
For example, when playing movie.mp4, you can
ask qp to play only the video track as follows:
qp -i -t 1 movie.mp4
When the file plays, you will see the video, but will not hear any audio,
because you excluded the audio track when you selected only the video
track with -t.
Similarly, you can select the audio track while excluding the video track:
qp -i -t 2 movie.mp4
When the file plays, the playback window will appear as
if movie.mp4 is an audio-only file. This is because you
excluded the video track when you selected only the audio track
with -t.
Selecting Multiple Tracks
The -t option can be given more than once. As an example,
you can play both the audio and video tracks of movie.mp4 as
follows:
qp -i -t 1 -t 2 movie.mp4
This is a rather pointless example because the result is exactly the same
as if you had not used the -t option at all. But it
demonstrates the fact that -t can be given more than once.
Playing Only Audio
If you have a movie file, but only want to play its audio, you can first
use -T to identify the audio track, and then
use -t to select that track.
However, qp has a special option just for this
case: -a. When you use this option, you are
asking qp to identify the audio track(s) for you, and then
play only those tracks while excluding all others:
qp -i -a movie.mp4
Play on Start
When qp starts up by opening a window with a control panel,
playing will not begin right away. The user needs to initiate playing,
by clicking the play button in the control panel, or pressing
the SPACE key.
You can skip this step entirely, and force qp to start
playing right away, by using the -p option:
qp -i -p movie.mp4
Working with Ranges
Sometimes, you may have a favorite segment in a media file. You can
have qp play only that segment, possibly with looping.
Range Specification
To select a segment, you give the -g option
to qp, followed by a range specification.
A range specification consists of the start and end times of the segment, separated by a hyphen:
hh:mm:ss-hh:mm:ss
In the above:
- hh are two digits indicating the hour
- mm are two digits indicating the minute
- ss are two digits indicating the second
For example, to play the range of “from the 5th second to the 10th
second,” you invoke qp as follows:
qp -i -g 00:00:05-00:00:10 movie.mp4
Looping
Very often, a range is also something you want to play repeatedly. You can turn on looping using the “Loop” command in the application’s menu.
Alternatively, you can specify the -l option when you
run qp, which does the same thing:
qp -i -l -g 00:00:05-00:00:10 movie.mp4
Milliseconds in the Range Specification
Rarely will a range you are interested in fall on whole second boundaries. In such cases, you can add a millisecond specification after the whole second part:
hh:mm:ss.fff
That is, after the whole second value, you add a period, which you can think of as a decimal point, followed by exactly 3 digits representing the number of milliseconds beyond the whole second.
For example, to play the range of “from 5 and a quarter seconds to 10 and
a half seconds,” you invoke qp as follows:
qp -i -g 00:00:05.250-00:00:10.500 movie.mp4
Note that you must always use exactly 3 digits for the millisecond specification. That is, a quarter second must be written as “.250” (instead of “.25”), and a half second must be written as “.500” (instead of “.5”).
Refining Ranges
Precisely identifying a range is a trial-and-error process, but is not as tedious as you may think.
Start by playing the file interactively and noting the approximate time values of the range, in terms of whole seconds. Doing this accurately will get you very close to the eventual result.
qp -i movie.mp4
Assuming this gives you the approximate range of:
00:00:04-00:00:23
Next, run again with this initial approximate range:
qp -i -g 00:00:04-00:00:23 movie.mp4
From here it’s just a matter of repeatedly re-running the command after making slight adjustments to the start and end times, until you get it right.
Some pointers on this process:
- Even though you have millisecond precision, this is rarely needed. In many cases, quarter second precision suffices.
-
The shell’s command history (e.g.
Control-Pto recall the previous command) and command line editing features are especially helpful for making quick adjustments to the previous command and running again. - You should also check how smoothly the end of the range transitions back to the beginning, in case you want to loop the range. Turn on the “Loop” option in the app’s menu to enable looping.
In my experience, starting from a good initial range estimate, only 3 or 4 further tries are needed to obtain an accurate (and loopable) range.
Reusing Ranges
Because you are in a command line environment, once you have identified a range to your satisfaction, you have a record of that range in textual form, which you can save and reuse.
For example, after you have determined that the
range 00:02:12.250-00:03:05.500 of the
file song.mp3 is one that you want to play repeatedly, you
can create an alias dedicated to playing just this range:
alias play_song_range='qp -pilg 00:02:12.250-00:03:05.500 song.mp3'
(In practice, you will use an absolute path for song.mp3.)
You can then put this alias in your shell initialization file, essentially saving the “work” of identifying the range.
Multiple Ranges
The -g option can be given more than once. The end result
is the concatenation of all ranges specified, in the same order as they
appear on the command line.
In the following example, the first 10-second range of the file is followed by the third 10-second range:
qp -i -g 00:00:00-00:00:10 -g 00:00:20-00:00:30 movie.mp4
You can think of each range specification as a copy-and-paste operation
from the original file to a temporary file that qp will
play. You can have as many of these copy-and-paste operations as you
want.
Non-Interactive Mode
All examples above have used the -i option, which results in
interactive playback. If you do not use -i, qp
plays in non-interactive mode.
This section highlights the differences between these two modes. If you are an experienced command line user, most of these points will be intuitive.
Auto Start
In non-interactive mode, playing begins as soon as the program starts.
This differs from interactive mode, where the user must initiate playing
(or use -p).
Auto Termination
In non-interactive mode, the program will automatically exit when playing has reached its end.
No Window for Audio Playback
In non-interactive mode, if only audio is being played, qp
does not display a window or menu, and will not appear in the Dock.
The only indication that the program is running is in the terminal window where you started it, and the fact that sound from the playback is being produced by your computer.
You can use the play/pause (⏯), fast forward (⏩), and rewind (⏪) media keys on your keyboard for basic control.
No Control Panel for Video Playback
In non-interactive mode, if video is being played, qp will
display a window and menu, and will appear in the Dock, but the playback
window will not have a control panel. You can use the media control keys
on your keyboard for basic control.
Range Repetition Count
Range specifications allow an optional repetition count, indicating the number of repetitions to be played for the range. The complete syntax of a range specification is:
hh:mm:ss[.fff]-hh:mm:ss[.fff][xn]
At the end of a range specification, you can add
an xn construct, where x is the lower
case letter ‘x’ and n is a number greater than or equal to zero.
This construct is called a “range repetition count” or “range trailer.”
The number specified in the range trailer is how many times the range
should be repeated, but only in non-interactive mode. You can
specify range trailers for interactive mode (-i), but they
will be ignored.
A range specification without a trailer causes the range to be played once. The following two ranges are equivalent:
00:00:05-00:00:10
00:00:05-00:00:10x1
You can specify a 0 (zero) for the range repetition count, which has the special meaning of “loop forever.”
00:00:05-00:00:10x0
Such a range will repeat indefinitely, until the program is terminated by the user manually. Any ranges specified after such a range will never be played.
Performance of Range Transitions
In non-interactive mode, because qp must account for the
range repetition count, it uses a different playback mechanism, one
designed to avoid resource exhaustion for range repetition counts of,
say, one million.
Unfortunately, this mechanism is not as smooth as the one used for interactive playback when transitioning between ranges.
If you experience gaps when qp transitions from one range to
the next, it is because the non-interactive playback mechanism is in use.
This problem can be avoided by not using multiple ranges in non-interactive mode, except for one very common usage case, addressed immediately below.
The -l Option Versus the x0 Range Trailer
To play a single range repeatedly in non-interactive mode, you have two choices:
-
Give the
-loption along with the range:qp -lg 00:00:20-00:00:30 movie.mp4
-
Use the
x0range trailer:qp -g 00:00:20-00:00:30x0 movie.mp4
It turns out that the first usage will result in a range transition, but the second one will not, giving it smoother performance.
Therefore, always use the x0 range trailer instead of
the -l option when repeating a single range in
non-interactive mode.
The qpl Script
A shell script named qpl is included in the bin
subdirectory of the distribution. It works in conjunction
with qp in non-interactive mode, and allows playing multiple
files and user-defined play lists. Instructions for using it are
provided as comments in the file.