Most software packages intended for Unix-like systems and distributed in source code form can be easily installed on macOS. This article describes doing this manually, instead of using a package manager.
Other articles on this site may describe how to use software installed from source code. Those articles may contain instructions on how to build the software. Those instructions will assume the setup described below.
Why not use a package manager?
Since macOS does not come with an official package manager, you would have to install one. This is extra work.
If you decide to install one, you must then research which package manager is best for you. This is more extra work.
Finally, having installed a package manager, you would need to learn to use it effectively. This is yet more extra work.
But if you already have some experience installing software from source, enough to be able to summarize the procedure as “configure; make; make install,” then it is actually less work to perform these steps manually, instead of bothering with a package manager.
Installing the developer tools
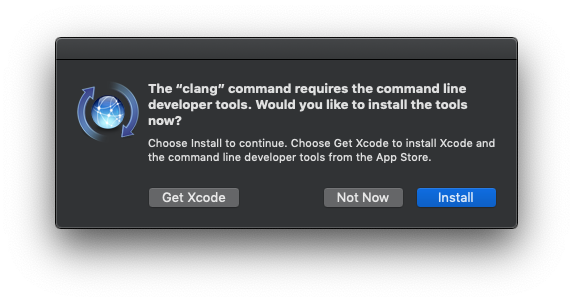
To install software from source, you need to install the command line developer tools.
A stock macOS installation does not include these tools. However, as soon as you try to run any development-related program without the developer tools installed, you are prompted to perform this installation.

Simply click “Install” to start the installation process.
Where to install?
As for where to put software installed from source, the two standard
choices are /usr/local and /opt.
Both of these are apparently official locations for holding user-installed software, but what is the distinction between the two? You can read some online discussions regarding this question, after which you may come to the same conclusion as I have, which is that nobody really knows.
There is one concrete difference between the two that, in our case, makes
it logical to use /opt instead of /user/local.
If you were using a package manager, it would remember which file belongs
to which package, and where that file is installed. This allows multiple
packages to be mixed under /usr/local, and still be
distinguishable.
Since we are not using a package manager, every program we install should
be contained entirely within a single directory. This is exactly
how /opt is organized.
On macOS, you need to create /opt manually, since it is not
part of a stock installation.
sudo mkdir /opt
The configure script (or equivalent) of most packages will
allow you to specify a --prefix argument, which names a
single directory into which all files of that package are placed. To
install a program in /opt, simply specify an appropriate
prefix:
./configure --prefix=/opt/program-x.y.z
Setting the PATH
If you have installed more than a few packages, you will want to automate
the process of adding their locations to your PATH.
The convention I have adopted is to install each package in a directory whose name contains the version number, and then also create a symbolic link to that directory, named without the version number. For example:
/opt/abc@ -> /opt/abc-1.2.3
/opt/abc-1.2.3/
/opt/xyz@ -> /opt/xyz-4.5.6
/opt/xyz-4.5.6/
Then, in the shell initialization file where you set
your PATH, you can iterate over only the symbolic links:
path="..."
manpath="..."

for dir in /opt/*; do
  if [ -L ${dir} -a -d ${dir} ]; then
    if [ -d ${dir}/sbin ]; then
      path=${dir}/sbin:${path}
    fi
    if [ -d ${dir}/bin  ]; then
      path=${dir}/bin:${path}
    fi
    if [ -d ${dir}/man  ]; then
      manpath=${dir}/man:${manpath}
    fi
    if [ -d ${dir}/share/man ]; then
      manpath=${dir}/share/man:${manpath}
    fi
  fi
done

export PATH=${path}
export MANPATH=${manpath}
That is, for each symbolic link in /opt that is a directory,
if it in turn has subdirectories
named sbin, bin, man,
or share/man, then those subdirectories are added to
either PATH or MANPATH.
You can change this loop to process other subdirectories as needed.
Note that after you install new packages, you will need to re-run the
above loop for those packages to be included in the PATH.